Tuesday, January 31, 2012

Mind-winter blooms for the Mid-winter Blues

Life always finds a way, even in mid-winter. I am heartened that I can see signs of growth, of season, of change in my garden. They remind me that however dark, cold, and miserable the mid-winter blues can be, the end is on the horizon - this has reason and this too shall pass. "To every thing there is a season, and a time to every purpose under heaven" - Ecclesiastes 3.1.

Ornamental kale's beautiful color and texture
The Purple and Green Aeoniums did not break in the last storm.
Detail of Aeonium blooms
Christmas Cyclamen continues to bloom
Snowdrops are the first harbinger of spring.
Fertilizer helps keep the Gartenmeister Bonstedt fuchsia flowering for the Anna's Hummingbirds
From flower to potential fruit - Anna Apple

Thursday, January 26, 2012

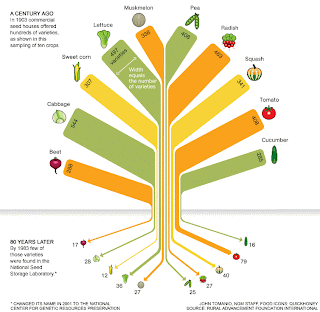
Our Dwindling Food Variety

A very telling graphic about crop and seed diversity, from National Geographic:
Our Dwindling Food Variety

Wednesday, January 25, 2012

Bare Root Season, Camellias, & Rosie Temptations

Winter months are usually slow in the Victory Garden - not so this year! My gardening New Year's resolution for 2012 is to fill in the naked spots in my garden, using gardening time table specific to Southern California. (I have discovered my time tables have been off in some cases, specifically when I pruned my roses.) Over the course of the year, I will be following Pat Welsh's Southern California Gardening: A Month by Month Guide. I adore Pat Welsh; her advice is excellent and her approach is green. Be on the look out for book reviews of both the gardening guide and memoirs!

See the tiny stick in the back? That's my new Mission Fig!
January is the start of bare root season, so now is the time to get bare root deciduous fruit trees and roses in the ground. Hubby and I went to our local Walter Anderson Nursery and picked up another Mission Fig. We placed it on the north wall of the garden in the number six vegetable bed, just to the right of the plumeria. It should receive plenty of sun in that location and extra warmth from the cinder block fence. 

Camellia japonica ready for planting
Now is also the time to plant camellias and azaleas. I chose to plant two camellias in the semi-shade of the eastern side of the garden near the garage. I choose two camellia japonica, one is a brilliant red bloom variety called Bob Hope and the other is Carter's sunburst, a variegated pink with both light and dark striations. They are very small right now, but I hope they grow and bloom profusely. Camellias bloom from fall to early spring and are a wonderful source of color and flowers in the winter months.

My roses are coming back nicely but earlier than expected after their pruning. I still am fighting orange rust thanks to my neighbor's infested roses being upwind of mine. Perhaps I can offer to prune his roses for him? I originally did not plan to plant any bare root roses this year, but I am sorely tempted to do so since I've seen some of the new offerings with gorgeous variations of color. I want to plant a Ketchup & Mustard and a Koko-Loco. (Please click here for images.) I have room for one more in my rose bed, but I may have to sacrifice space in my sweet pea bed for the second.

I have added a number of cool season annual flowers for added color and have planted some extra lettuces to augment our salads. Hubby is trying out artichokes in the empty spaces of the mini-orchard on the east side of the house. Artichokes are supposed to grow profusely and become tall, but right now they look half eaten by pests. We continue to harvest tangerines, savoy cabbage, and radishes. I am at a loss on how to serve the radishes. My recipe round-up will take a hiatus this month as I perfect a cabbage recipe and figure out what to do with radishes. Please let me know if you have any suggestions!

Colossus White with Blotch Pansy
Angel Tiger Eye Viola
Anna Apple blooms - I hope I have more fruit this year!
Weeds are flowers, too, once you get to know them. - AA Milne

Saturday, January 14, 2012

Cultivating Sweet Peas

I first discovered the lovely and fragrant sweet pea in 2009 while visiting gardens on the Clairemont Garden Tour. At that time, it was early May and far too late to start these vining flowers from seeds or seedlings. If you would like to enjoy these blooms by spring, now is the time to get to work!

I recommend purchasing your first batch of sweet peas as seedlings from your local nursery, however, if none are available, try your hand at starting from seed. I started my first batch from seedlings in late autumn of 2009 and had beautiful blooms by February. Make sure to read your labels, some varieties are for early bloom in December, while later flowering varieties will bloom in early spring and continue blooming through June.

Firstly, plant seeds or seedlings in full sun in rich soil amended with compost and low-nitrogen fertilizer. If you are in a colder climate, plant after the last frost. (In coastal Southern California, the frosts are not severe enough to damage the sweet peas.) If planting from seed, place each seed one inch deep in the ground and space them six inches apart. Plan to water seeds and seedlings 2 – 3 times a week depending on rainfall. The vines will need strong support, so make sure to place a trellis near your seeds. I like to re-purpose, so I use old tomato cages. Other gardeners use bamboo trellises or wire screens. Sweet peas will climb ugly chain-link fences, giving a romantic feel to an unattractive barrier.

The 2011 crop begins to climb its trellis.
Multiple vines will eventually emerge from the point of origin. I like to thin out the vines and train them up their trellises using natural (non-synthetic) string. Thinning helps keep the sweet peas from becoming overgrown and allows air flow in between the vines, helping to prevent mildew growth. Pinch the tips of the vine to encourage branching; this will produce more branching vines and more blooms. Pick flowers frequently as this will encourage the plant to produce more blooms.

Keep in mind that sweet peas are unruly and prolific; they are more at home in romantic and wild gardens than in strictly regimented ones. I trim them back to keep them out of the roses, but otherwise I let them go crazy with color and fragrance. They can get up to 6 feet tall, sometimes higher. I top them off at a little over 5 feet (my own height). When the vines begin to look crispy and the blooms spent (late May to early June), I collect the seed pods, shell the seeds, and save them for the following year. I find my saved seeds to be hardier than the store-bought ones. After all, the parents survived my garden in such a beautiful fashion that their decedents deserve a chance to grow.

The 2010 crop looked like a Monet canvas!
Detail of the 2010 crop - the white, pink and purple flowers came first. These red blooms were an end of season burst!
The 2011 crop was more pinks and purples - it is a roll of the dice when collecting seeds because the blooms are gone.
The 2012 crop - I purchased these as seedlings. Notice the string securing the vines to the trellis.
2012 crop again - these were started from seed I collected in 2010.

Sunday, January 8, 2012

Pruning Roses in the Inez Grant Parker Rose Garden

The gorgeous roses in the Inez Grant Parker Rose Garden in Balboa Park got some expert and novice TLC this weekend during its annual pruning. The San Diego Rose Society generously donated their time and expertise to teach beginners to successfully prune roses. I had previously pruned my roses back in November, a time frame that I later discovered was way too early for Southern California roses. November is the appropriate prune back time for much colder climates (say East Coast). When I did the pruning I did so without much confidence in my cuts - was I doing this right? What if I kill my precious roses?

Turns out, you really have to work hard to kill roses. At the bare minimum, if you don't damage the root ball/ bud union as the base of the plant, the rose will come back and bloom in the spring. The tools of the trade are hand pruners, longer handled pruners, a small saw for cutting back thick, dead wood, and a heavy duty pair of garden gloves rated for use with roses. There are differing techniques among rose enthusiasts, but the San Diego Rose Society taught the following process for Southern California gardens:

  1. Remove the access height, trimming the plant down to about 2 feet tall.
  2. Remove the dead branches and branches that are smaller that a pencil in diameter.
  3. Remove canes that branch over the middle of the plant, creating a bowl-like shape.
  4. Remove canes that cross one another; choose the more dominant cane to keep.
  5. Most plants will have 4 -5 dominant canes remaining per root ball.
  6. On the dominant canes, you will see small buds, you want to cut right above this small bump, at a 45 degree angle. Please ensure the bud bump faces outward. New growth will move outward from this point.
  7. Remove all leaves. At this time in the year, many leaves are diseased. Complete removal ensures new growth will be clean and healthy.
  8. If pruning in January, your first blooms should arrive in March.
I begin trimming the canes down to 2 feet tall. Notice my heavy duty gloves - I went home with no injuries!
A San Diego Rose Society member removes dead wood at the root ball.
Hubby removes crossing canes and begins to create a bowl shape in the remaining canes.
This is a good example of a pruned rose bush. 4 - 5 canes remain with no canes in the middle of the plant.
A San Diego Rose Society member demonstrates where to cut the canes, right above the new bud growth.
The finished product - we made it through a whole rose bed! The leaves will need to be raked up and removed to prevent orange rust, black spot, and other rose diseases.
I completed pruning the year old plants. I had to be careful not to over prune these delicate roses!
Hubby and I worked for 3 hours pruning roses - Hubby estimates he completed pruning of 60 plants! We will have to return in late March to see if our handiwork was helpful to the plants. If you visit this rose garden any time soon, please remember that this is dormant time. The pruned plants make looks stark and dreary, but they will return in full glory in a few short months. 

Lastly, this entry is my milestone 100th post and I am so excited to continue building on my gardening knowledge and sharing it on this blog. I encourage you to show your support and sign up to follow my blog using Google Connect - all you need is a gmail account!  Thank you again for all you support!

Monday, January 2, 2012

The Post-Apocalyptic Garden

My description of my garden as post-Apocalyptic is tongue and cheek, but is does look like it has been through a war of sorts. The once lovely canopy that kept me and Hubby cool on hot summer days lost its battle to the Santa Ana winds. The skeleton frame is clearly visible while the shredded fabric flaps in the breeze.

My poor deciduous fruit trees are shells as well, leaves dropped unceremoniously in the dirt to rot. I began my winterizing plan by removing (shaking or picking off) the rest of the dying leaves. I sprayed them down with water to remove debris and bugs and I will follow up with a dormant spray to protect them from infestation.


While the plum, pomegranate and fig while away their dormancy, my citrus has come alive with vast quantities of fruit. I harvested my lime completely since fruit left on the tree turns yellow and mushy. I am hoping I will get a second crop so Hubby can continue making garden cocktails. Otherwise I am out of luck. I harvested the tangerine as well; no amount of harvesting can get all the fruit off that tree! As it is, I eat 3 – 4 tangerines a day (no scurvy here)! Our co-workers will get a post New Years treat when we return to work. I continued my citrus care with a good hose-down, knocking down debris and bugs. I will need to follow up with an anti-aphid and anti-scale remedy; I hope to find a product that is organic or at least reasonably mild environmentally speaking. I will need to fertilize and deep water. Despite being at approximately 16 inches of rainfall (6 over the average rainfall for this time of year) the forecast continues to be be dry for the next 10 days.

I try to use organic methods when possible, but sometimes, I just have to employ the death from above approach. I do not carpet bomb, by rather take out strategically determined targets, those horrible winter weeds. I sprayed the weeds on the east side of the yard in our mini-orchard and spot treated parts of the front yard as well. I do not plan to use poison on the produce beds, but rather grind up the weeds as insta-mulch when the time is right for planting.

It feels good to be back in the garden after a holiday hiatus. I am still formulating my garden goals and plans for this year, but I am confident the year will be full of flowers, urban wildlife, and of course, plenty of tomatoes!

Proof of life! Here come my Calla Lilies!